Pod的健康检查机制
1 探针简介
对线上业务来说,保证服务的正常稳定是重中之重,对故障服务的及时处理避免影响业务以及快速恢复一直是开发运维的难点。Kubernetes提供了健康检查服务,对于检测到故障服务会被及时自动下线,以及通过重启服务的方式使服务自动恢复。
2 使用Liveness及Readness探针
Liveness探针:主要用于判断Container是否处于运行状态,比如当服务crash或者死锁等情况发生时,kubelet会kill掉Container,然后根据其设置的restart policy进行相应操作(可能会在本机重新启动Container,或者因为设置Kubernetes QoS,本机没有资源情况下会被分发的其他机器上重新启动)
Readness探针:主要用于判断服务是否已经正常工作,如果服务没有加载完成或工作异常,服务所在的Pod的IP地址会从服务的Endpoints中被移除,也就是说,当服务没有ready时,会将其从服务的load balancer中移除,不会再接受或响应任何请求。
2.1 服务可用性和自动恢复如果服务的健康检查(readiness)失败,故障的服务实例从service endpoint中下线,外部请求将不会再转发到该服务上,一定程度上保证正在提供的服务的正确性,如果服务自我恢复了(比如网络问题),会自动重新加入service endpoint对外提供服务。
另外,如果设置了Container(liveness)的探针,对故障服务的Container(liveness)的探针同样会失败,container会被kill掉,并根据原设置的container重启策略,系统倾向于在其原所在的机器上重启该container、或其他机器重新创建一个pod;
2.2 建议1 . 对全部服务同时设置服务(readiness)和Container(liveness)的健康检查。
2 . 通过TCP对端口检查(TCPSocketAction),仅适用于端口已关闭或进程停止情况。因为即使服务异常,只要端口是打开状态,健康检查仍然是通过的。
3 . 基于第二点,一般建议用ExecAction自定义健康检查逻辑,或采用HTTP Get请求进行检(HTTPGetAction)
4 . 无论采用哪种类型的探针,一般建议设置检查服务(readiness)的时间短于检查Container(liveness)的时间,也可以将检查服务(readiness)的探针与Container(liveness)的探针设置为一致。目的是故障服务先下线,如果过一段时间还无法自动恢复,那么根据重启策略,重启该Container、或其他机器重新创建一个Pod恢复故障服务。
2.3 example liveness.yaml容器会创建一个文件/tmp/healthy,30秒后删除;探针5秒会检查一次,检查方式为cat /tmp/healthy文件是否存在,检查到容易有问题,探测失败3次,则重建容器
[root@k8s-master-10 Liveness]# cat liveness.yaml apiVersion: v1 kind: Pod metadata: labels: test: liveness name: liveness-exec-changjian spec: containers: - name: liveness image: busybox args: - /bin/sh - -c - touch /tmp/healthy; sleep 30; rm -rf /tmp/healthy; sleep 600 livenessProbe: exec: command: - cat - /tmp/healthy initialDelaySeconds: 5 periodSeconds: 5
3 存活探针

默认情况下: 以镜像打包基于容器资源编排系统创建的pod对于用户和服务就相当于一个黑盒。想要探测容器中的用户部署的应用和服务是否正常,都被容器编排系统(k8s)所阻挡。正常情况下,任何一个为云原生开发的程序都会考虑到这个问题,为了监视容器中运行的“应用”正常各种指标应该向外输出,比如,健康状态,实现的方式,比如使用一个URL或者VirtualHost的单独容器对外输出健康状态指标。暴露给容器边界的外部。
Metrics:提供的指标数据,有业务级,系统级等 tracing: 分布式链路追踪可能会使用 ,可以认为埋点或者叫做探针 探针就相当于一个接口,一个管道。后期直接使用即可,可以理解为URI或者端口探测 readiness: 就绪状态检测 liveness: 存活状态检测
Pod默认提供探针的接口: Liveness
下面非常重要:
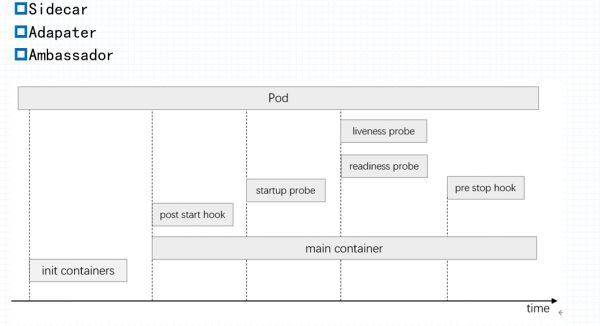
判断一个pod中容器运行健康状态与否:有两种探针,而且周期性运行 liveness和 readiness;
liveness: 如果容器没有正常运行,或者没有得到正确的值,kubelet会根据容器重启策略,重启或者杀死容器;
readiness: 判断容器内的应用程序从启动,到应用程序是否正常运行,能够提供用户正常访问和接受客户端请求,如果一个容器没有通过就绪检测,而容器可能会重启它,service会把对应的主机ip从后端移除,直到下次健康检测正常才把它加进来。
spec: containers: - name: … image: … livenessProbe: exec <Object> # 命令式探针 httpGet <Object> # http GET类型的探针 tcpSocket <Object> # tcp Socket类型的探针 initialDelaySeconds <integer> # 发起初次探测请求的延后时长 建议设置长一点,有些服务启动很慢 periodSeconds <integer> # 请求周期 timeoutSeconds <integer> # 超时时长 successThreshold <integer> # 成功阈值 (表示探测n次成功,才表示容器是健康的,状态改变之后的确认次数) failureThreshold <integer> # 失败阈值 状态改变之后,探测n此失败才确认失败
Pod默认提供的三种探针方式:
1 . LivenessProbe: 周期性探测, 检测未通过时,kubelet会根据restartPolicy的定义来决定是否会重启该容器;未定义时,Kubelet认为只容器未终止,即为健康;
以下是对存活探针方式的三种访问参数,ReadinessProbe访问方式一样:
命令查看readinessProbe有哪些参数
[root@k8s-master-10 Liveness]# kubectl explain pods.spec.containers.readinessProbe KIND: Pod VERSION: v1 RESOURCE: readinessProbe <Object> DESCRIPTION: Periodic probe of container service readiness. Container will be removed from service endpoints if the probe fails. Cannot be updated. More info: https://kubernetes.io/docs/concepts/workloads/pods/pod-lifecycle#container-probes Probe describes a health check to be performed against a container to determine whether it is alive or ready to receive traffic. FIELDS: exec<Object> One and only one of the following should be specified. Exec specifies the action to take. failureThreshold<integer> Minimum consecutive failures for the probe to be considered failed after having succeeded. Defaults to 3. Minimum value is 1. httpGet<Object> HTTPGet specifies the http request to perform. initialDelaySeconds<integer> Number of seconds after the container has started before liveness probes are initiated. More info: https://kubernetes.io/docs/concepts/workloads/pods/pod-lifecycle#container-probes periodSeconds<integer> How often (in seconds) to perform the probe. Default to 10 seconds. Minimum value is 1. successThreshold<integer> Minimum consecutive successes for the probe to be considered successful after having failed. Defaults to 1. Must be 1 for liveness. Minimum value is 1. tcpSocket<Object> TCPSocket specifies an action involving a TCP port. TCP hooks not yet supported timeoutSeconds<integer> Number of seconds after which the probe times out. Defaults to 1 second. Minimum value is 1. More info: https://kubernetes.io/docs/concepts/workloads/pods/pod-lifecycle#container-probes
查看exec探测帮助:
[root@k8s-master-10 Liveness]# kubectl explain pods.spec.containers.readinessProbe.exec KIND: Pod VERSION: v1 RESOURCE: exec <Object> DESCRIPTION: One and only one of the following should be specified. Exec specifies the action to take. ExecAction describes a "run in container" action. FIELDS: command<[]string> Command is the command line to execute inside the container, the working directory for the command is root ('/') in the container's filesystem. The command is simply exec'd, it is not run inside a shell, so traditional shell instructions ('|', etc) won't work. To use a shell, you need to explicitly call out to that shell. Exit status of 0 is treated as live/healthy and non-zero is unhealthy.
查看http方式帮助:
[root@k8s-master-10 Liveness]# kubectl explain pods.spec.containers.readinessProbe.httpGet KIND: Pod VERSION: v1 RESOURCE: httpGet <Object> DESCRIPTION: HTTPGet specifies the http request to perform. HTTPGetAction describes an action based on HTTP Get requests. FIELDS: host<string> Host name to connect to, defaults to the pod IP. You probably want to set "Host" in httpHeaders instead. httpHeaders<[]Object> Custom headers to set in the request. HTTP allows repeated headers. path<string> Path to access on the HTTP server. port<string> -required- Name or number of the port to access on the container. Number must be in the range 1 to 65535. Name must be an IANA_SVC_NAME. scheme<string> Scheme to use for connecting to the host. Defaults to HTTP.
注意:
initialDelaySeconds 表示容器在启动之后,如果不设置时间,可能就是马上进行存活检测,因为此时有些大应用可能还没有启动,就检测失败了,检测失败之后又自动重启了,所以就处于重启的循环当中。所以此处应当设置一个延时等待时间。等容器中应用都启动好之后,再进行检测。
ReadinessProbe:
周期性探测,检测未通过时,与该Pod关联的Service,会将Pod从Service的后端可用端点列表中删除;直接再次就绪,重新添加回来。未定义时,只要容器未终止就是就绪;
StartProbe:
1.16版本之后支持,启动状态检测,检测容器刚刚启动是成功的,只有他通过之后,查看是否有LivenessProbe,然后生效LivenessProbe,一般用于大型服务启动时检测;
以上的三种探针都支持以下三种类似的检测方式:
下面三种检测方法:
1 . ExecAction: 直接执行命令,命令成功返回探测成功;制作容器时候预留一个探测接口ip/api;
2 . TCPSocketAaction: 端口能够正常打开,对于握手能够正常相应,发起三次握手。握手相应,表示成功;
3 . HTTPGetAction: 向指定的Path发起HTTP请求,2xx,3xx表示响应码成功;

apiVersion: v1 kind: Pod metadata: name: liveness-exec-demo namespace: default spec: containers: - name: demo image: ikubernetes/demoapp:v1.0 imagePullPolicy: IfNotPresent livenessProbe: exec: command: ['/bin/sh', '-c', '[ "$(curl -s 127.0.0.1/livez)" == "OK" ]'] initialDelaySeconds: 5 timeoutSeconds: 1 periodSeconds: 5 #执行上面的demo,判断执行的命令是否等于ok,如果等于ok,表示探测是成功的。 kubectl apply -f .
提交post请求,容器会自动重启
[root@k8s-master1 ~]# curl 10.244.135.28/livez OK[root@k8s-master1 ~] curl -XPOST -d "livez=Faile" 10.244.135.28/livez3.3 使用tcp测试
example1
[root@k8s-master1 lianxi]# cat liveness-tcpsocket-demo.yaml apiVersion: v1 kind: Pod metadata: name: liveness-tcpsocket-demo namespace: default spec: containers: - name: demo image: ikubernetes/demoapp:v1.0 imagePullPolicy: IfNotPresent ports: - name: http containerPort: 80 securityContext: capabilities: add: - NET_ADMIN #方便后续添加iptables测试 livenessProbe: tcpSocket: port: http periodSeconds: 5 initialDelaySeconds: 5 [root@k8s-master-10 Liveness]# kubectl exec liveness-tcpsocket-demo -- iptables -A INPUT -p tcp --dport 80 -j REJECT # 容器立马探测失败,5s之后就会重启 [root@k8s-master-10 ~]# kubectl get pods -w NAME READY STATUS RESTARTS AGE liveness-tcpsocket-demo 1/1 Running 0 4h23m liveness-tcpsocket-demo 1/1 Running 1 4h24m
example2
[root@k8s-master-10 Liveness]# cat nginx-tcp-liveness.yaml apiVersion: v1 kind: Pod metadata: name: nginx-tcp-liveness-probe spec: containers: - name: nginx-tcp-liveness-probe image: nginx:latest ports: - name: http-80-port protocol: TCP containerPort: 80 livenessProbe: tcpSocket: port: 80 initialDelaySeconds: 3 periodSeconds: 10 timeoutSeconds: 3 [root@k8s-master-10 Liveness]# kubectl apply -f nginx-tcp-liveness.yaml pod/nginx-tcp-liveness-probe created [root@k8s-master-10 Liveness]# kubectl get pods -o wide |grep nginx nginx-tcp-liveness-probe 1/1 Running 0 2m5s 172.17.66.5 192.168.0.14 <none> <none> # 模拟故障,进入Pod安装htop [root@k8s-master-10 Liveness]# kubectl exec -it nginx-tcp-liveness-probe bash root@nginx-tcp-liveness-probe:/# apt-get update root@nginx-tcp-liveness-probe:/# apt-get install htop root@nginx-tcp-liveness-probe:/# htop CPU[|| 5.4%] Tasks: 4, 0 thr; 1 running Mem[|||||||||||||| 792M/5.61G] Load average: 0.02 0.06 0.05 Swp[ 0K/0K] Uptime: 2 days, 22:17:44 PID USER PRI NI VIRT RES SHR S CPU% MEM% TIME+ Command 1 root 20 0 10652 3344 2532 S 0.0 0.1 0:00.00 nginx: master process 30 nginx 20 0 11056 1764 460 S 0.0 0.0 0:00.00 nginx: worker process 31 root 20 0 3976 2072 1576 S 0.0 0.0 0:00.00 bash 311 root 20 0 4780 1676 1240 R 0.0 0.0 0:00.00 htop 运行htop查看进程,容器进程通常为1; root@nginx-tcp-liveness-probe:/# kill 1 root@nginx-tcp-liveness-probe:/# command terminated with exit code 137 [root@k8s-master-10 Liveness]# kubectl get pods -w |grep nginx nginx-tcp-liveness-probe 1/1 Running 0 4m47s nginx-tcp-liveness-probe 0/1 Completed 0 4m51s nginx-tcp-liveness-probe 1/1 Running 1 5m7s [root@k8s-master-10 Liveness]# kubectl describe pod nginx-tcp-liveness-probe |tail node.kubernetes.io/unreachable:NoExecute for 300s Events: Type Reason Age From Message ---- ------ ---- ---- ------- Normal Scheduled 5m39s default-scheduler Successfully assigned default/nginx-tcp-liveness-probe to 192.168.0.14 Normal Pulling 48s (x2 over 5m39s) kubelet, 192.168.0.14 Pulling image "nginx:latest" Warning Unhealthy 48s kubelet, 192.168.0.14 Liveness probe failed: dial tcp 172.17.66.5:80: connect: connection refused Normal Pulled 33s (x2 over 5m23s) kubelet, 192.168.0.14 Successfully pulled image "nginx:latest" Normal Created 33s (x2 over 5m23s) kubelet, 192.168.0.14 Created container nginx-tcp-liveness-probe Normal Started 33s (x2 over 5m23s) kubelet, 192.168.0.14 Started container nginx-tcp-liveness-probe3.4 通过http进行探测
只看响应码,如果是2xx,3xx表示正常,如果是4xx,5xx就是表示失败
[root@k8s-master1 lianxi]# cat liveness-httpget-demo.yaml apiVersion: v1 kind: Pod metadata: name: liveness-httpget-demo namespace: default spec: containers: - name: demo image: ikubernetes/demoapp:v1.0 imagePullPolicy: IfNotPresent livenessProbe: httpGet: path: '/livez' port: 80 scheme: HTTP initialDelaySeconds: 5 [root@k8s-master-10 Liveness]# curl 172.17.66.2/livez OK
4 就绪探针
就绪检查用于应用接入到service的场景,用于判断应用是否已经就绪完毕,即是否可以接受外部转发的流量,健康检查正常则将pod加入到service的endpoints中,健康检查异常则从service的endpoints中删除,避免影响业务的访问。
下面是容器启动之后通过15s之后进行就绪绪检测,在15s之前不会将访问容器的流量调度到后端的service ip,导致访问失败。通过检测之后才将service 添加到k8s后端的service ip中;
Example1
[root@k8s-master1 lianxi]# cat readiness-httpget-demo.yaml apiVersion: v1 kind: Pod metadata: name: readiness-httpget-demo namespace: default spec: containers: - name: demo image: ikubernetes/demoapp:v1.0 imagePullPolicy: IfNotPresent readinessProbe: httpGet: path: '/readyz' port: 80 scheme: HTTP initialDelaySeconds: 15 timeoutSeconds: 2 periodSeconds: 5 failureThreshold: 3 restartPolicy: Always
Example2
创建一个Pod,使用httpGet的健康检查机制,定义readiness就绪检查探针检查路径/test.html
[root@k8s-master-10 Liveness]# cat httpget-liveness-readiness-probe.yaml apiVersion: apps/v1 kind: Deployment metadata: name: nginx-tcp-liveness-probe labels: app: nginx-server spec: replicas: 1 selector: matchLabels: app: nginx-server template: metadata: labels: app: nginx-server spec: containers: - name: nginx-tcp-liveness-probe image: nginx:latest imagePullPolicy: IfNotPresent ports: - containerPort: 80 livenessProbe: #存活检查探针 httpGet: port: 80 path: /index.html scheme: HTTP initialDelaySeconds: 3 # 容器启动等待多少秒后存活和就绪探测器才会被初始化,默认0; periodSeconds: 10 # 执行探测的时间间隔,默认10,最小1 successThreshold: 1 # 探测器失败后,被视为最小成功连续数,默认值为1,存活和启动探测这个值必须是1; timeoutSeconds: 3 # 探测超时等待多少秒,默认1; failureThreshold: 3 # 探测失败,k8s的重试次数,存活探测情况下的放弃意味着重启容器, 就绪探测情况>下放弃Pod会被打上未就绪标签,默认3; readinessProbe: #就绪检查探针 httpGet: port: 80 path: /test.html scheme: HTTP initialDelaySeconds: 3 periodSeconds: 10 timeoutSeconds: 3 [root@k8s-master-10 Liveness]# cat nginx-service.yaml apiVersion: v1 kind: Service metadata: labels: app: nginx name: nginx-service spec: ports: - name: http port: 80 protocol: TCP targetPort: 80 selector: app: nginx-server type: ClusterIP # 我们可以看到就绪探针检测不通过 [root@k8s-master-10 Liveness]# kubectl describe pod nginx-tcp-liveness-probe-57bb9c7668-qcssq |tail Tolerations: node.kubernetes.io/not-ready:NoExecute for 300s node.kubernetes.io/unreachable:NoExecute for 300s Events: Type Reason Age From Message ---- ------ ---- ---- ------- Normal Scheduled 101s default-scheduler Successfully assigned default/nginx-tcp-liveness-probe-57bb9c7668-qcssq to 192.168.0.14 Normal Pulled 101s kubelet, 192.168.0.14 Container image "nginx:latest" already present on machine Normal Created 101s kubelet, 192.168.0.14 Created container nginx-tcp-liveness-probe Normal Started 101s kubelet, 192.168.0.14 Started container nginx-tcp-liveness-probe Warning Unhealthy 6s (x10 over 96s) kubelet, 192.168.0.14 Readiness probe failed: HTTP probe failed with statuscode: 404 # 查看service的endpoints,发现此时endpoints为空, 因为readiness就绪检测异常,kubelet认为此时pod并未就绪,因此并未将其加入到endpoints中 [root@k8s-master-10 Liveness]# kubectl get svc NAME TYPE CLUSTER-IP EXTERNAL-IP PORT(S) AGE kubernetes ClusterIP 10.0.0.1 <none> 443/TCP 28d nginx-service ClusterIP 10.0.0.69 <none> 80/TCP 4m32s [root@k8s-master-10 Liveness]# kubectl describe svc nginx-service Name: nginx-service Namespace: default Labels: app=nginx Annotations: kubectl.kubernetes.io/last-applied-configuration: {"apiVersion":"v1","kind":"Service","metadata":{"annotations":{},"labels":{"app":"nginx"},"name":"nginx-service","namespace":"default"},"s... Selector: app=nginx-server Type: ClusterIP IP: 10.0.0.69 Port: http 80/TCP TargetPort: 80/TCP Endpoints: Session Affinity: None Events: <none> # 进入到pod中手动创建网站文件,使readiness健康检查正常 [root@k8s-master-10 ~]# kubectl exec -it nginx-tcp-liveness-probe-57bb9c7668-qcssq bash root@nginx-tcp-liveness-probe-57bb9c7668-qcssq:/# echo "readiness probe demo" > /usr/share/nginx/html/test.html [root@k8s-master-10 Liveness]# kubectl describe svc nginx-service Name: nginx-service Namespace: default Labels: app=nginx Annotations: kubectl.kubernetes.io/last-applied-configuration: {"apiVersion":"v1","kind":"Service","metadata":{"annotations":{},"labels":{"app":"nginx"},"name":"nginx-service","namespace":"default"},"s... Selector: app=nginx-server Type: ClusterIP IP: 10.0.0.69 Port: http 80/TCP TargetPort: 80/TCP Endpoints: 172.17.66.2:80 Session Affinity: None Events: <none> [root@k8s-master-10 Liveness]# kubectl describe endpoints nginx-service Name: nginx-service Namespace: default Labels: app=nginx Annotations: endpoints.kubernetes.io/last-change-trigger-time: 2021-09-11T22:25:15+08:00 Subsets: Addresses: 172.17.66.2 NotReadyAddresses: <none> Ports: Name Port Protocol ---- ---- -------- http 80 TCP Events: <none>
5 Pod中容器使用的两种钩子介绍
对容器主要做一些初始化的操作
post start hook: 容器启动初始化 启动后的钩子 pre stop hook: 容器结束之前执行的操作
[root@k8s-master1 lianxi]# cat lifecycle-demo.yaml apiVersion: v1 kind: Pod metadata: name: lifecycle-demo namespace: default spec: containers: - name: demo image: ikubernetes/demoapp:v1.0 imagePullPolicy: IfNotPresent securityContext: capabilities: add: - NET_ADMIN livenessProbe: httpGet: path: '/livez' port: 80 scheme: HTTP initialDelaySeconds: 5 lifecycle: postStart: #启动前执行的钩子 exec: command: ['/bin/sh','-c','iptables -t nat -A PREROUTING -p tcp --dport 8080 -j REDIRECT --to-ports 80'] preStop: #容器结束前执行的钩子 exec: command: ['/bin/sh','-c','while killall python3; do sleep 1; done'] restartPolicy: Always
在容器启动的时候自动执行添加规则,容器结束的执行会执行上面的杀死python命令
[root@k8s-master-10 Liveness]# kubectl exec lifecycle-demo -- iptables -vnL -t nat Chain PREROUTING (policy ACCEPT 6 packets, 360 bytes) pkts bytes target prot opt in out source destination 0 0 REDIRECT tcp -- * * 0.0.0.0/0 0.0.0.0/0 tcp dpt:8080 redir ports 80 Chain INPUT (policy ACCEPT 6 packets, 360 bytes) pkts bytes target prot opt in out source destination Chain OUTPUT (policy ACCEPT 0 packets, 0 bytes) pkts bytes target prot opt in out source destination Chain POSTROUTING (policy ACCEPT 0 packets, 0 bytes) pkts bytes target prot opt in out source destination 5.1 钩子三种实行方法
钩子也是支持三种实行的方法: 对于postStart和preStart 都是一样的
[root@k8s-master-10 Liveness]# kubectl explain pods.spec.containers.lifecycle.postStart KIND: Pod VERSION: v1 RESOURCE: postStart <Object> DESCRIPTION: PostStart is called immediately after a container is created. If the handler fails, the container is terminated and restarted according to its restart policy. Other management of the container blocks until the hook completes. More info: https://kubernetes.io/docs/concepts/containers/container-lifecycle-hooks/#container-hooks Handler defines a specific action that should be taken FIELDS: exec<Object> One and only one of the following should be specified. Exec specifies the action to take. httpGet<Object> HTTPGet specifies the http request to perform. tcpSocket<Object> TCPSocket specifies an action involving a TCP port. TCP hooks not yet supported
6 Pod中多容器模式运行
Sidecar:为了让外部的请求更好的接入Pod中容器而设计的(主要是代理);
Adapater: 主要是让容器请求更好的适配外部的请求而设计;
Ambassador: 主要为了让Pod中容器请求更好接入外部的环境设计;
(访问数据库,容器把数据给base容器,由base容器访问数据库)
加入定义两个初始化容器: Pod生命周期
容器初始化1 ---> 成功完成 ----> 第二个初始化容器2 ---> 成功完成 ---> 主容器(如果定义了sidecar可能和主容器一起启动)
说明:
一般在容器中使用初始化容器做特权操作,而不是直接定义特权字段,初始化容器执行完之后就会终止了, 比如添加iptables规则, 可以通过初始化容器来实现, 添加完iptables之后自动终止,然后运行主容器,而主容器没有net-admin权限;
Example
[root@k8s-master-10 Liveness]# cat sidecar-container-demo.yaml apiVersion: v1 kind: Pod metadata: name: sidecar-container-demo namespace: default spec: containers: - name: proxy image: envoyproxy/envoy-alpine:v1.14.1 command: ['/bin/sh','-c'] args: ['sleep 5 && envoy -c /etc/envoy/envoy.yaml'] lifecycle: postStart: exec: command: ['/bin/sh','-c','wget -O /etc/envoy/envoy.yaml http://ilinux.io/envoy.yaml'] - name: demo image: ikubernetes/demoapp:v1.0 imagePullPolicy: IfNotPresent env: - name: HOST value: "127.0.0.1" - name: PORT value: "8080"
通过envoys代理访问内部demo,demo只是监听在127.0.0.1的8080端口
[root@k8s-master-10 Liveness]# kubectl get pods -o wide NAME READY STATUS RESTARTS AGE IP NODE NOMINATED NODE READINESS GATES lifecycle-demo 1/1 Running 0 21m 172.17.66.3 192.168.0.14 <none> <none> liveness-httpget-demo 1/1 Running 0 48m 172.17.66.2 192.168.0.14 <none> <none> sidecar-container-demo 2/2 Running 0 2m1s 172.17.66.4 192.168.0.14 <none> <none> [root@k8s-master-10 Liveness]# curl 172.17.66.4 iKubernetes demoapp v1.0 !! ClientIP: 127.0.0.1, ServerName: sidecar-container-demo, ServerIP: 172.17.66.4!
我们看看具体envoy的定义
[root@k8s-master-10 Liveness]# cat /etc/envoy/envoy.yaml admin: access_log_path: /tmp/admin_access.log address: socket_address: { address: 0.0.0.0, port_value: 9901 } static_resources: listeners: - name: listener_0 address: socket_address: { address: 0.0.0.0, port_value: 80 } filter_chains: - filters: - name: envoy.http_connection_manager config: stat_prefix: ingress_http codec_type: AUTO route_config: name: local_route virtual_hosts: - name: local_service domains: ["*"] routes: - match: { prefix: "/" } route: { cluster: local_service } http_filters: - name: envoy.router clusters: - name: local_service connect_timeout: 0.25s type: STATIC lb_policy: ROUND_ROBIN load_assignment: cluster_name: local_service endpoints: - lb_endpoints: - endpoint: address: socket_address: address: 127.0.0.1 port_value: 8080

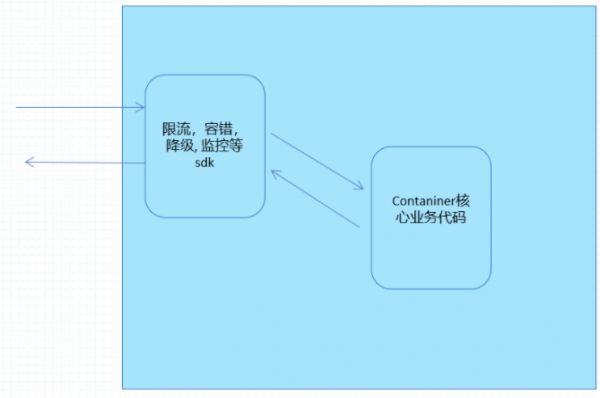
上面这张图也是服务网格的一种思想,将限流,容错,降级, 监控等调用sdk的服务放在一个应用中实现,把核心业务放在另一个应用程序中;
相关知识
要想Pod好
k8s健康检查 spring k8s健康检查探针多个地址
spring boot 应用在 k8s 中的健康检查(一)
[云原生] Kubernetes(k8s)健康检查详解与实战演示(就绪性探针 和 存活性探针)
Nacos 健康检查机制
健康检测一体机身体健康检查公卫体检机
托幼机构中的健康检查管理
幼儿健康检查制度
儿童健康检查工作制度(12篇)
职业健康检查包括()。A.上岗前的健康检查B.在岗期间的健康检查C.定期的健康检查D.离岗时的健康检
网址: Pod的健康检查机制 https://m.trfsz.com/newsview905323.html